
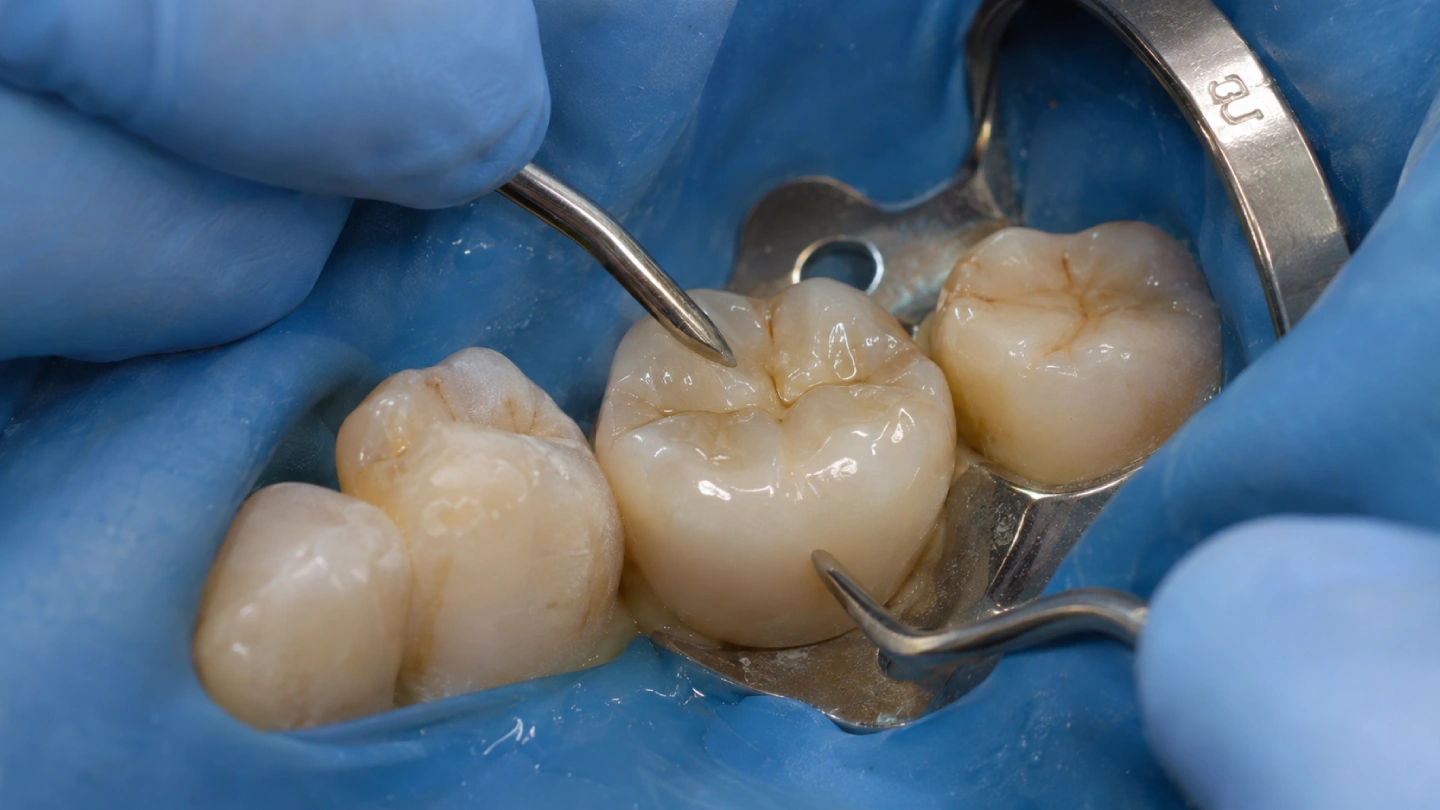
Cementing an e.max crown is where most of the clinical risk on a lithium-disilicate case sits. The ceramic is forgiving; the choice between adhesive bonding, self-adhesive resin, or conventional cementation — and the surface steps that follow that choice — decide whether the restoration lasts.
Quick answer. A full-coverage e.max crown can be bonded, luted with a self-adhesive resin, or cemented conventionally when preparation retention is adequate. Partial-coverage restorations — veneers, inlays, onlays, thin occlusal veneers, minimally invasive crowns at the 1.0 mm limit — must be bonded with hydrofluoric acid etching, silane coupling, and a resin cement, following the manufacturer’s Instructions for Use (IFU).
Four questions that settle the method
Work through these in order; each has two exits.
# | Question | If yes | If no |
|---|---|---|---|
1 | Is this a partial-coverage restoration (veneer, inlay, onlay, occlusal veneer, 1.0 mm minimally invasive crown)? | Bond. Full HF + silane + resin cement. Non-negotiable. | Go to question 2. |
2 | Is the preparation height ≥ 4 mm on molars, ≥ 3 mm on other teeth, with a total occlusal convergence around 10–20°? | Any of the three paths is on the table. Go to question 3. | Bond, or extend the preparation. Self-adhesive and conventional cements rely on mechanical retention that is not there. |
3 | Is the ceramic ≥ 1.5 mm in the loaded area? | Self-adhesive resin or conventional glass ionomer are legitimate options. | Lean adhesive — thinner e.max benefits from the strength bonding adds. |
4 | Can you achieve adequate dry-field isolation at the margin for the full working time of a resin cement? | Any resin path is open. | Conventional luting with glass ionomer or RMGI is safer than bonding under contamination. See the isolation section. |
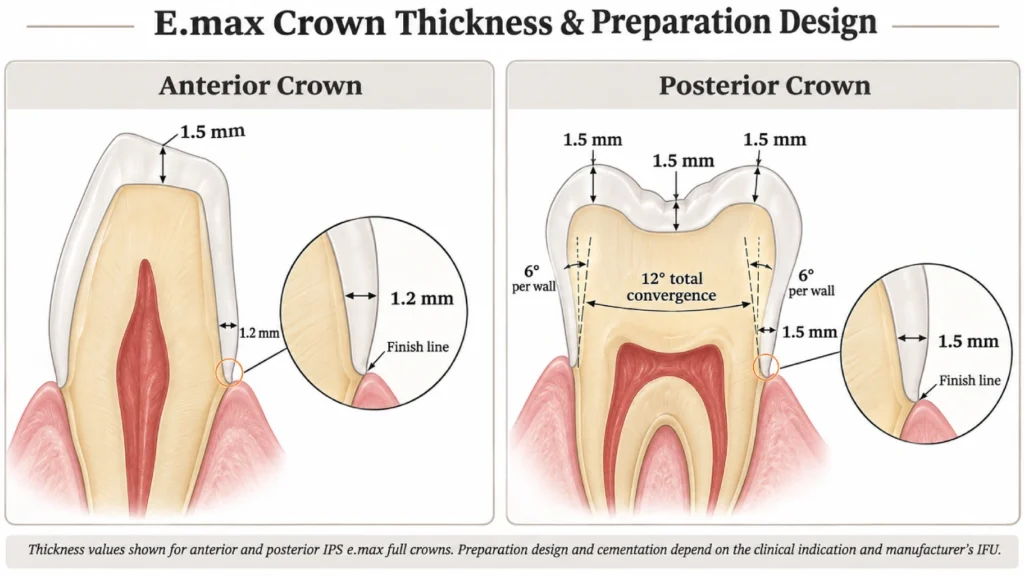
“1.0 mm” and “1.5 mm” are not two values for the same decision. 1.0 mm is the thickness below which the restoration must be bonded. 1.5 mm is the thickness above which traditional luting becomes reasonable if the preparation also provides retention. A crown at 1.2 mm sits in between: bonding is strongly indicated, but failure is not inevitable without it. The IFU for IPS e.max CAD and Press lays out the matrix in detail — see Ivoclar’s e.max Cementation Guidelines and the IPS e.max CAD Chairside IFU (the Chairside PDF is an older revision; the current Press and CAD IFUs supersede its indication text).
Total occlusal convergence vs. single-wall taper. Older Ivoclar guidance for conventional cementation references about 4–6° per wall. The classical prosthodontic review by Goodacre and co-workers reports 10–20° total convergence, which translates to roughly 5–10° per wall. They are not in conflict — they measure the same angle two ways. Pick a reporting convention and stay with it in the chart.
A U.S. practice-based study found that clinicians bonded about 71% of lithium-disilicate crowns in day-to-day work — useful as a reality check on habit, not as evidence that bonding is required. The Maroulakos systematic review of 17 studies covering 2,436 crowns did not show that bonded e.max crowns survive longer than conventionally cemented ones; the review graded the body of evidence as poor quality and the comparisons were not head-to-head. Both paths work when the right conditions are met.
Minimum ceramic thickness by restoration type
The thresholds below come from the current IPS e.max Press and CAD Instructions for Use. Measure in the loaded wall, not at the margin.
Restoration | Minimum thickness (occlusal / cervical) | Cementation options |
|---|---|---|
Thin occlusal veneer | 0.4 mm / 0.3 mm | Adhesive bonding only |
Veneer | 0.7 mm / 0.6 mm | Adhesive bonding only |
Inlay / onlay | 1.0 mm (isthmus) / 1.0 mm (walls) | Adhesive bonding only |
Minimally invasive crown | 1.0 mm / 1.0 mm | Adhesive bonding only |
Anterior crown | 1.5 mm / 1.2 mm | Adhesive, self-adhesive, or conventional (if retention is adequate) |
Posterior crown | 1.5 mm / 1.5 mm | Adhesive, self-adhesive, or conventional (if retention is adequate) |
The surface protocol: three entry points, not one
Which steps you run on the intaglio depends on which cement path you chose. Running the full “etch, silane, bond” sequence on a crown you are planning to lute conventionally is a reflex worth breaking — it adds steps, invites contamination, and does nothing for a glass ionomer cement.
Entry A — Adhesive bonding (partial coverage, thin crowns, any case where you want the strongest resin interface)
- Hydrofluoric acid etch of the fitting surface. Current IFUs for IPS e.max Press and CAD specify 5% HF for 20 seconds. Rinse thoroughly, dry oil-free.
- Silane coupling. There are two IFU-supported options — a pure silane primer, or a silane-containing universal/MDP primer such as Monobond Plus used per its own 60-second protocol. The choice is not about pure versus not pure; it is about whether the primer’s manufacturer explicitly indicates it for etched lithium disilicate. Apply, let it react for the time stated by its own IFU (typically 60 seconds), then dry.
- Resin cement. Load, seat, tack-cure to clean up excess. Apply glycerin gel at the margins to neutralise the oxygen-inhibited layer (about 50 µm thick), then complete the final cure at 20 seconds per millimetre of ceramic per segment at 500–800 mW/cm², or 10 seconds at 900–1,300 mW/cm². The Variolink Esthetic DC IFU is a concrete reference for the full choreography — see the manufacturer’s cementation sequence here.
Entry B — Self-adhesive resin cement
Clean the intaglio so it is free of saliva, blood, and try-in paste residue. Do not run HF or a separate silane step — self-adhesive resins contain acidic monomers that bond without a dedicated primer stage, and adding ceramic primer changes the surface chemistry the cement expects. Load, seat, tack-cure, finish. This path is only safe when the preparation is retentive and the ceramic is at or above full-coverage thickness.
Entry C — Conventional cementation (glass ionomer, RMGI, zinc phosphate)
Skip HF, skip silane, skip the resin primer. The conventional path relies on mechanical retention and the cement’s own setting chemistry. Running the glass-ceramic primer sequence leaves hydrophobic residue that interferes with glass ionomer’s acid-base reaction. Clean, dry, and seat.
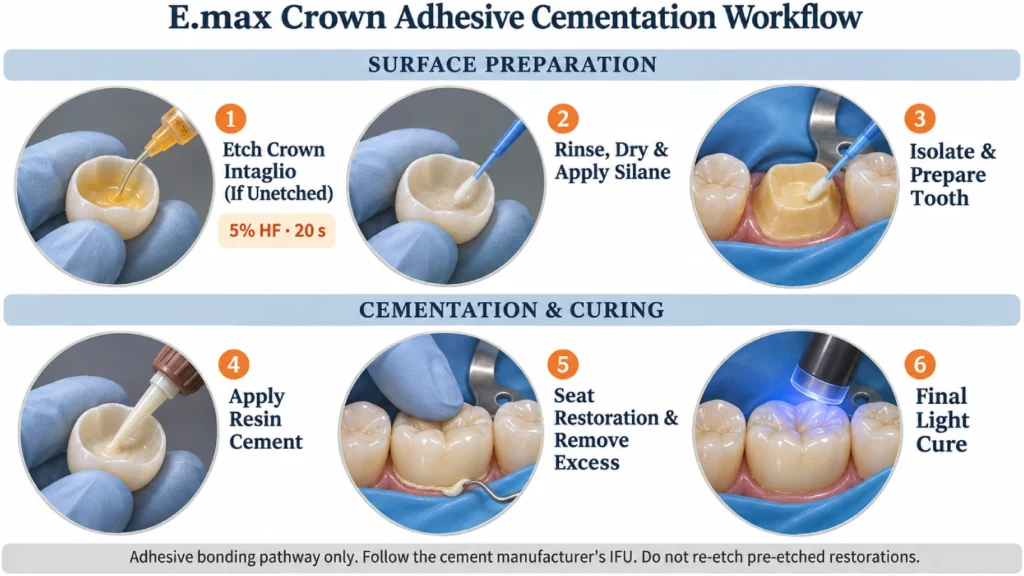
If the lab has already etched the intaglio
Do not re-etch with HF on a crown that already comes etched. Hydrofluoric acid is a selective dissolution step; a second application removes more glass phase, which flattens the micro-retentive relief that was the whole point.
What the crown looks like when you unbox it | What to do next |
|---|---|
Clean, un-etched intaglio (lab delivered the restoration without surface treatment) | Run the full adhesive protocol: 5% HF 20 s → silane → resin cement. |
Pre-etched intaglio, no try-in contamination yet | Skip the HF. Apply silane (or your universal primer) per its IFU, then bond. |
Pre-etched intaglio, tried in and contaminated with saliva, blood, or try-in paste | Do not re-etch with HF. Rinse and dry, clean the bonding surface with Ivoclean for 20 seconds, rinse and dry again, then re-apply the silane/primer and bond. The Variolink IFU describes this sequence step by step. If Ivoclean is not on hand, a brief phosphoric acid clean has independent lab evidence behind it (see Yoshida et al. 2021 and Puppin-Rontani et al. 2019) — treat it as a cleaner, not a replacement for the original etch. |
If you want to control which scenario you walk into, tell the lab how you want the intaglio delivered before you place the order. The step you save at the chair is worth saving knowingly, not by accident.
Choosing the resin cement
Once bonding is the decision, cement selection matters mostly for colour behaviour and curing mode.
- Light-cure only is defensible when the ceramic is thin (under about 2 mm) and translucent. Light reaches the full cement layer, and chemistries that darken over time (common amine-containing dual-cure systems) are kept out of the aesthetic zone.
- Dual-cure is the default for full-coverage crowns and anywhere the light path cannot be trusted — thick ceramic, cervical margins, or deep sub-gingival finishes.
- Shade matters mostly for thin cases. Alrabeah et al. showed ceramic specimens as thin as 0.5 mm transmit colour shifts (ΔE > 3.3) from the cement above the clinically perceptible threshold. For a 1.5 mm posterior crown, the ceramic itself masks most of that variation. On anterior aesthetics, use try-in paste to pre-visualise the result rather than relying on a catalogue shade name.
- Avoid eugenol-containing temporary cements on cases planned for adhesive bonding. Phenolic compounds depress resin polymerisation and are listed as a contraindication in most adhesive resin cement IFUs; waiting several days to let the residue clear is not a reliable workaround.
- Avoid air abrasion on the fitting surface of a glass-ceramic crown. Grit-blasting is a zirconia-only treatment; the correct surface treatment for e.max is HF etching followed by silane.
Common resin cements in current clinical use include Variolink Esthetic, RelyX Ultimate, Panavia, and Multilink Automix. Any of them seats e.max within its own IFU envelope. The choice between them is secondary to running the matching surface protocol correctly.
Isolation: what to do when a rubber dam will not seat
A rubber dam is the standard for resin cementation. In the real world the margin sits sub-gingival, the dam will not seat without taking down the papilla, and you have ten minutes.
Option | What it buys you | What it costs you |
|---|---|---|
Rebook the appointment with crown lengthening or electrosurgery in advance | Clean field, confident bond | Second visit, patient time |
Combine retraction cord, suction, and cotton-roll isolation under a careful seat | Workable field for a brief working time | You accept more variable isolation; working time must be tight |
Switch to a conventional or self-adhesive luting path | Isolation requirements drop | You lose the strengthening effect of a true bond; retention and thickness have to carry the restoration alone |
Change the margin position before you prepare — bring it supragingival | Permanent fix | Only works at the planning stage |
What does not work is going through the motions of an adhesive protocol in a wet field. That is where most of the debonds we see on returned cases trace back to.
Try-in, seating, light-curing
- Try the restoration in before any surface treatment. Check seat, contacts, occlusion, shade. A crown that is adjusted after bonding is harder to polish without breaking the margin.
- Clean the intaglio after try-in using the method matched to its delivery state — see the pre-etched scenarios table above.
- Dry field, apply primer, apply cement, seat under firm pressure. Hold until tack-cure.
- Tack-cure 2 seconds per quadrant for cement clean-up. Remove excess with a probe. Floss the contacts.
- Apply glycerin gel at the margins, then run the full cure at the parameters set out in Entry A step 3. Hit buccal, lingual, mesial, distal, and occlusal.
- Check occlusion again. Bonding changes seating by a few microns; the pre-cementation bite check is not a substitute for a post-cementation bite check.
Marginal gap values around 120 µm are commonly reported for lithium-disilicate crowns in the scoping review by Hamza et al. — useful as a reference range, not a clinical pass/fail line, since measurement methods vary across studies.
What debond patterns tell us about cementing an e.max crown
A crown that comes back in a patient’s hand, intact, no cement on the tooth or inside the restoration, tells a different story from one that fractures through the ceramic. Three recurring patterns on returned e.max cases, each pointing back to a specific step.
- Clean fracture of the ceramic in the loaded wall — in most of these the ceramic was under its minimum thickness in that wall, often with occlusal interference that was not relieved. Check the pre-cementation thickness measurement in the case notes; check the opposing dentition for a cusp that worked its way into a cross-bite contact.
- Debond with cement still filmed to the intaglio but none on the tooth — a preparation problem. Not enough retention form for a conventional cement, or the dentin bonding step failed under contamination.
- Debond with cement filmed to the tooth but a clean intaglio — a bonding-to-ceramic problem. The classic cause is a missed silane step, a silane applied over a contaminated etched surface, or the universal primer’s chemistry mismatching the ceramic. See Blatz et al. on debonding mechanisms for the mechanistic background.
None of these is a reason to switch materials. Each is a reason to tighten up a specific step in a specific case.
How we deliver e.max restorations at Istar
An e.max case sits on the bench very differently from a monolithic zirconia crown, so we think about the handoff backwards from the chair. The three questions we hear from clinicians most often — which intaglio state am I getting, is this ceramic actually at the thickness my case needs, can I see the ceramic processing choice before the restoration ships — all live upstream of the cement step. Our workflow is built around answering them before the crown leaves the lab.
- Intaglio state on the work ticket, not by default. Pre-etched, un-etched, or matched to a specific resin cement system — specify it at order entry and we confirm it in writing before production. Changing it after the case ships means a remake.
- Ceramic processing matched to seating. Staining versus layering, surface finish, and whether we glaze the fitting side are coordinated with the cement path you plan to run. The design proof shows the loaded-wall thickness measurement before milling or pressing.
- One case ID through the whole workflow. CAD, pressing or milling, ceramic work, QC, and dispatch all run under one record, so the batch, the operator, and the inspection notes for a specific crown stay queryable if a question comes up at the chair.
- Remakes without a quarrel. If something leaves our side of the handoff out of spec — open margin, misreading of the shade note, incomplete seating on the master die — we remake. If the request changes mid-case on your side, we quote the change openly rather than absorbing it quietly into the next invoice.
Everything else — compliance paperwork, materials-traceability records, courier choice — we handle to the standards your region expects and share documentation on request. An e.max crown you receive from us has a known provenance for every variable the cement step depends on.
FAQ on cementing an e.max crown
Can I use RMGI as the final cement on an e.max crown?
RMGI (resin-modified glass ionomer) is a legitimate option in the same envelope as a conventional glass ionomer: full-coverage crown, ≥ 1.5 mm ceramic in the loaded wall, retentive preparation. Skip the ceramic primer stage — RMGI relies on chemical set and ionic exchange with dentin, not on the HF–silane interface. It is not an option for veneers, inlays, onlays, or thin crowns at the 1.0 mm limit.
Can I temporise with a resin-only self-curing material and bond at the next visit instead of using a temporary cement at all?
Yes. A spot of flowable composite over a cotton pellet, or a pre-made chairside PMMA shell with no luting agent, both skip the temporary-cement step entirely and leave the preparation surface clean for the adhesive protocol you will run at seating.
How does the cementation decision change if the patient has heavy bruxism?
Heavy bruxism does not force a specific cement; it forces a thickness and material decision upstream. Lithium-disilicate crowns at or below the IFU minimum thickness are a weaker option under heavy occlusal load than full-contour zirconia, regardless of whether they are bonded. If the case is going to stay e.max, build thickness into the loaded wall and plan a night guard; the cement path then follows the four-question flow as normal.
Why does Istar not pre-apply silane to the fitting surface before shipping?
Silane needs to react fresh, close to the moment the restoration is seated. A silane layer applied days ahead of time hydrolyses and loses the siloxane bond you were trying to form; the surface it leaves behind is harder to recover than a clean etched glass surface. The step is cheap at the chair and expensive to compensate for later, so it stays in the clinician’s hands.
Evidence and sources
- Ivoclar — IPS e.max CAD product information. ivoclar.com
- Ivoclar — IPS e.max cementation guidelines (full matrix). PDF
- Ivoclar — IPS e.max CAD Chairside IFU (older revision; useful for the technique sequence). PDF
- Ivoclar — Variolink Esthetic DC IFU. PDF · product page
- Makhija et al. 2019 — Choice of cement for single-unit crowns in the U.S. National Dental PBRN. PubMed
- Maroulakos et al. 2019 — Cement type and clinical performance of zirconia and lithium-disilicate crowns: a systematic review. PubMed
- Alrabeah et al. 2023 — Effect of resin cement shade on translucent zirconia and lithium-disilicate colour. PMC
- Hamza et al. 2022 — Marginal and internal fit of lithium-disilicate crowns: a scoping review. PMC
- Blatz et al. 2018 — Mechanisms of debonding in zirconia and lithium-disilicate resin-bonded restorations. PMC
- Puppin-Rontani et al. 2019 — Effect of surface treatments on bond strength to lithium disilicate. PubMed
- Yoshida et al. 2021 — Cleaning agents and resin bond strength to etched lithium disilicate. PMC
- Dentistry Today — Ceramic restorations: guidelines for cementing or bonding. Article