
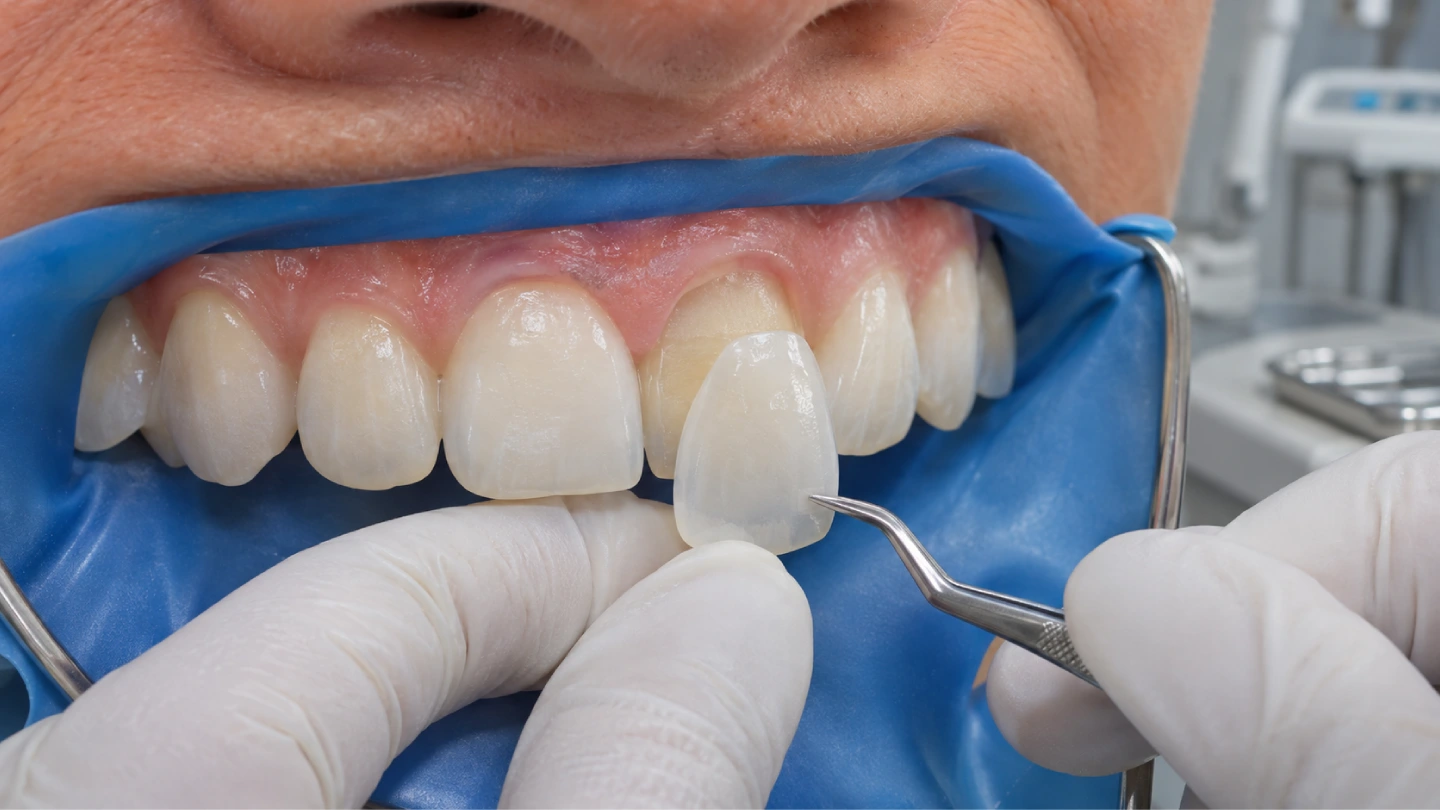
A veneer case lives or dies in the last ten minutes. The ceramic is already made, the preparation is already done, and now the resin cement has to do something that no other restoration asks of it: hold a 0.3–0.7 mm shell to enamel without changing its color, without pulling it out of place, and without leaving a margin a probe can catch.
The outcome of cementing veneers is decided earlier than the chairside step — in the ceramic thickness the lab milled, in the state of the intaglio surface at delivery, in the way the proximal contacts seat. Material sets the route, thickness sets the cement, and the margin tells you where a case went wrong.
Material decides the route
Three families of ceramic show up on veneer cases, and each demands a different opening move. Choosing the wrong parameter row — most often by applying a feldspathic porcelain etch time to a lithium disilicate restoration — over-etches the surface and reduces flexural bond strength (Pocket Dentistry, “Veneers Cementation” chapter; Ivoclar Vivadent IPS e.max cementation guidelines, PDF).
| Ceramic family | Hydrofluoric acid etch | Silane | Resin-bondable? |
|---|---|---|---|
| Feldspathic porcelain | 5–10% HF, 60–90 seconds (published values span 60 s to 2.5 min) | Yes, 60 s | Yes |
| Lithium disilicate (IPS e.max) | 5% HF, 20 seconds — identical in the Ivoclar IFU and in the clinical literature | Yes, 60 s | Yes |
| Translucent zirconia | Do not etch. HF has no effect on polycrystalline zirconia | Silane alone is not enough | Needs air-abrasion with Al₂O₃ ≤1 bar + an MDP-containing primer |
The “1 to 2 minutes” number that drifts around how-to articles is a feldspathic parameter — applying it to lithium disilicate is over-etching, and the IFU explicitly disagrees. The 20-second e.max value is the one parameter in this protocol where reputable sources state the same figure.
Light-cure vs dual-cure resin cement
Light-cure and dual-cure resin cements can both hold a veneer, but each has a condition it needs. Pick the wrong one and the restoration loses either color stability or depth of cure.
| Cement type | Light must reach every point? | Known trade-off | Fits the case when |
|---|---|---|---|
| Light-cure resin cement | Yes | Depth of cure drops sharply when the ceramic is too thick or too opaque | Thin, translucent restorations with reliable isolation |
| Dual-cure resin cement | No (chemical path finishes what light cannot) | Higher color change over time than light-cure under in-vitro aging — pooled ΔE values of 1.73 for light-cure vs 3.13 and 4.92 for two dual-cure cements after thermocycling (Dent Res J, 2021) | Thick, opaque restorations; onlays and crowns on the same material; cases where full light exposure cannot be reliably delivered |
| Self-adhesive dual-cure | No separate adhesive step | Lower bond strength to enamel than full etch-and-rinse adhesives | Not indicated for thin anterior porcelain laminates |
A product-level caution worth keeping in view: Ivoclar’s own IFU states that Multilink Automix is not indicated for thin veneers or veneers in general (Ivoclar IPS e.max cementation guidelines, PDF). It is a dual-cure cement from the same family as Variolink, and the manufacturer draws a line between the two for a reason.
Thickness changes the rule
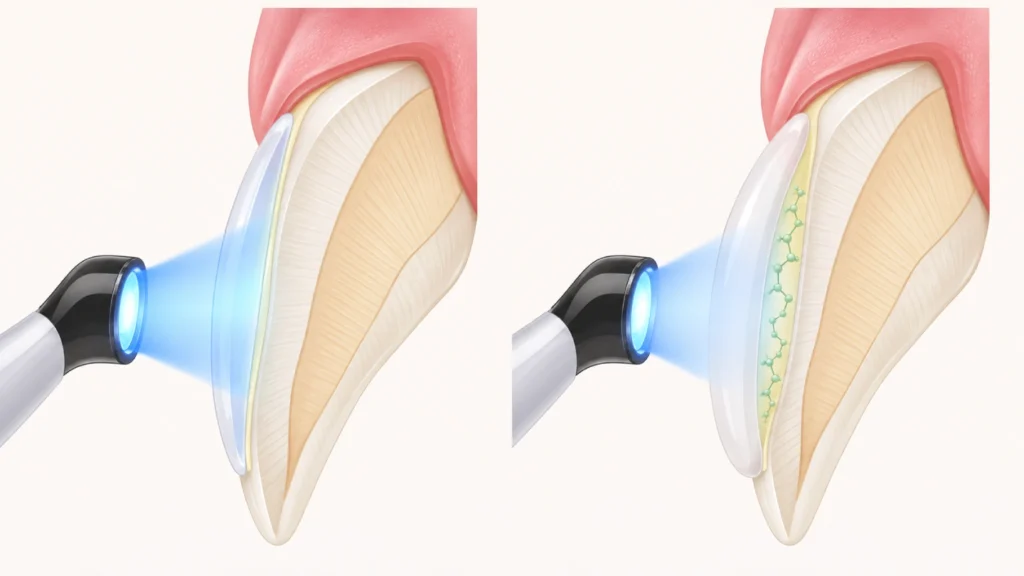
Ceramic thickness is a lab-side variable. At 0.6, 0.7, or 0.8 mm enough light reaches the cement for a light-cure system to reach a healthy degree of conversion — the published values for high-translucency lithium disilicate hold around 86–87% at those thicknesses. At 1.0 mm the same system drops to 65.71%, with the fall measured as statistically significant (p < 0.0001) (Polymers, 2023, 15(7):1617).
The 0.8 mm threshold
A light-cure cement cured through 0.8 mm is a different restoration than the same cement cured through 1.0 mm. When any zone of the restoration — a cervical build-out, a deep incisal halo, a thickened labial profile — reaches 1.0 mm or more, the cement choice should swing to dual-cure, or to an extended light-cure time with a high-output curing light held perpendicular to the surface.
Intaglio surface prep: cementing emax veneers step by step
Istar’s default veneer delivery is unetched and unsilanated — HF-etched surfaces are time-sensitive and silane layers do not travel well. For the clinician that means the full intaglio protocol runs in the operatory.
- Verify the intaglio is clean. If the restoration was tried in and touched saliva, clean it with 37% phosphoric acid applied with a brush for 30–60 seconds, then rinse and dry. Phosphoric is used here only as a cleaner, not as an etchant for the ceramic.
- Etch lithium disilicate with 5% hydrofluoric acid gel for 20 seconds; feldspathic porcelain for 60–90 seconds. Follow the specific product IFU.
- Rinse thoroughly for at least 20 seconds. Dry.
- If a chalky white residue remains, place the restoration in distilled water and ultrasonicate for 5 minutes, or apply 37% phosphoric for 60 seconds and rinse again. Residual etch salts between the ceramic and the resin reduce bond strength (Spear Education, “Steps in the Veneer Seating Process: Part II”).
- Apply a silane coupling agent. Rub for 20 seconds, then let the solvent evaporate for 60 seconds. With a two-bottle system (silane + MDP primer), follow the manufacturer’s wait times — they are not interchangeable.
- Apply the adhesive if the system calls for it. Air-thin to a visibly uniform film; a thick adhesive layer keeps the restoration from seating fully.
What not to do to lithium disilicate
Do not sandblast lithium disilicate before cementation. Air-abrasion is for zirconia. On lithium disilicate the HF etch creates the micromechanical pattern; sandblasting removes material unpredictably.
Pre-etched or pre-silanated deliveries
When a lab ships veneers pre-etched or pre-silanated, treat them as time-stamped parts. The protective seal has to be intact, and the restoration still needs a short phosphoric acid rub (not an HF re-etch) and a careful rinse before the cement step.
Tooth-side preparation
The tooth side is less demanding on surface chemistry but more demanding on isolation.
- Isolate completely. A rubber dam is the default for anterior veneer bonding whenever gingival anatomy allows it. Where a dam cannot seal around a subgingival margin, use retraction cord plus suction and dry the field aggressively. Saliva and blood contamination is the first predictor of debonding — and a failure the operator can see at the time of placement.
- Clean the preparation with pumice slurry, not sodium bicarbonate powder. Bicarbonate powders leave a residue that interferes with adhesion. If a powder is needed, use glycine (Solventum Dental Blog, “Expert tips and tricks for veneer cementation”).
- Selective etch with 37% phosphoric acid: 15 seconds on enamel, 10 seconds on exposed dentin. Rinse for the same duration. Keep dentin visibly moist for a wet-bonding adhesive, or re-wet with a dedicated primer for a dry-bonding system.
- Apply the adhesive, rub for 20 seconds, air-thin for 5 seconds until the film stops flowing. Whether to pre-polymerize the adhesive before placing the restoration is a point where published clinicians disagree — one school cures to control film thickness and gain stronger tooth-side bond, the other leaves it uncured to avoid lifting the ceramic off the preparation. Both positions carry mechanical reasoning. With a thin uncured film and a low-viscosity resin cement, the two converge in practice.
- Keep the field dry from this point to final cure. No water, no air blast at the margin, no cotton roll change that drags saliva back onto the preparation.
The enamel-versus-dentin substrate is the hinge. Pooled in-vitro bond strength for light-cured resin cements reaches 21.1 MPa on enamel and 11.3 MPa on composite restorative substrates — a near-halving (Saudi Dental Journal systematic review and meta-analysis, 2026). When the preparation extended into existing composite or dentin, factor that into the cement choice.
Try-in and shade control
Try-in paste has a refractive index close to the cured resin cement; water does not. Water-based try-in shows a different color than the cement will deliver after placement.
- Dry the restoration and the preparation. Try in dry first to verify seating and marginal fit.
- Apply try-in paste in the shade matching the planned cement. Seat gently and evaluate under natural light.
- Record the chosen shade before removing. Clean the restoration thoroughly — ultrasonic bath in distilled water for 5 minutes, or a 60-second phosphoric acid rub followed by a thorough rinse. Residual try-in paste at the interface is a known failure point.
Seating, tack-cure, and clean-up
The seating sequence for a six- or eight-unit anterior case:
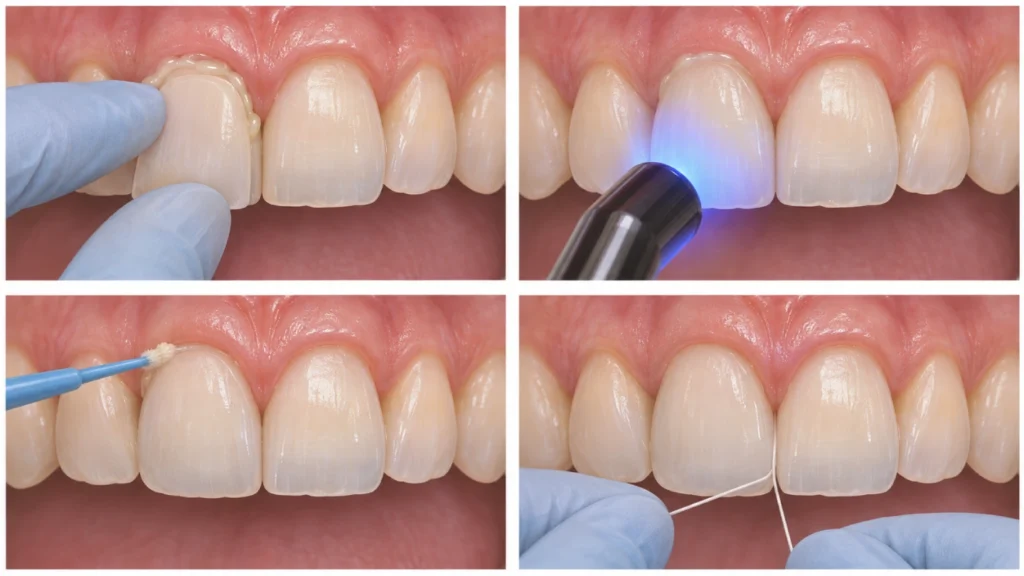
- Load cement into the intaglio of the first restoration — one of the central incisors — using a syringe tip, not a mix pad.
- Seat with gentle finger pressure, oriented along the long axis of the preparation. Rock slightly to express excess from the margins. Do not force.
- Tack-cure for 1–2 seconds from the facial. The intent is a gel state that cleans up like firm rubber — not a full cure.
- Remove the gross excess with a fine brush, then a sharp explorer. Floss through the interproximal before anything passes gel stage. If the cement cures with excess still at the margin, removal becomes mechanical and risks scoring enamel or ceramic.
- Place the second central, then the laterals, then the canines. The two centrals set the midline; laterals and canines are referenced to them.
- With all restorations in position and gross excess removed, apply a glycerin gel along the margins to block the oxygen-inhibited layer, then final-cure. Light from facial for at least 20 seconds per surface and from lingual for the same, or follow the time-per-millimeter rule from the cement IFU — a common value is at least 10 seconds per millimeter of ceramic thickness, which pushes thicker cases toward 30 seconds per surface.
- Remove glycerin, floss again, verify occlusion. Polish any adjusted margins with a dedicated veneer polishing sequence.
Why the tack-cure window is narrow
Cement manufacturers list slightly different gel times, and warmer rooms shorten them. Tack-cure beyond 3–4 seconds on many current dual-cure resin cements pushes excess past the rubber-gel state into brittle solid, at which point it has to be broken off mechanically — a failure path discussed often in clinical peer forums. Bench-test the tack time on a mix pad before light-tacking intraorally with an unfamiliar cement.
Tack-cure is not “a little light to save time.” It is a controlled step into the gel phase, which is the only stage at which excess can still be removed cleanly.
What the lab controls before the cement opens
A lab decides more than a parts list. Five upstream decisions at Istar Dental Lab belong in the same conversation as the chairside protocol.
Interproximal contact and seating path. A proximal that seats too tight pushes cement out of the preparation during try-in and then traps the restoration short of final seating. These contacts are dialed in during digital design and verified against the printed model before milling.
Facial curvature matched to the preparation line. Over-reduced areas get thicker ceramic bulk by default; under-reduced areas force the lab to thin the labial profile until it falls below the structural minimum. Both patterns show up as marginal issues at seating. The scan review before milling catches these so the clinician gets a heads-up when a prep tolerance is tight.
Multi-unit packaging in clinical seating order. Restorations are identified by tooth number and grouped from midline out — centrals, laterals, canines — so the chairside sequence matches the tray without rearranging units mid-case.
Prep-shade photograph requested when it matters. For high-translucency ceramic cases, a prep-shade photograph is requested on cases where the preparation color will transmit through the ceramic. Try-in paste compensates for a small shift at the interface; nothing compensates for a substrate color that was absent from the submission.
Material certificates and lot numbers available on request. Batch-level traceability for the ceramic is documented — brand, origin, and lot number can accompany the shipment on request.
Reading margin problems after cementing veneers
The failure modes after resin bonding have an informative asymmetry. In clinical studies, debonding is a rare mode — around 2% of long-term technical complications for lithium disilicate — while marginal gap is far more common, around 13.73% in the same body of literature (Journal of Esthetic and Restorative Dentistry systematic review, 2025). A separate systematic review of 6500 porcelain laminate restorations reported a 10-year cumulative survival rate of 95.5%, with the majority of failures concentrated in the first two years post-placement (Journal of Clinical Medicine, 2021, systematic review).
Veneers rarely fall off whole. Their margins misbehave.
| What you see at the margin | Where to look first |
|---|---|
| Dark line at the facial-cervical margin | Residual cement at gel stage that was not cleaned before cure; also check whether the preparation had unsupported enamel at the cervical |
| Chalky white line | HF salts left on the intaglio; the ceramic surface was not rinsed and ultrasonicated enough |
| Marginal gap on an explorer check | Thick adhesive film under the restoration; cement set before full seating; proximal contact too tight preventing full seat |
| Shade shift noticed days or weeks after placement | Dual-cure cement without a shaded cover; try-in paste residue trapped at the interface |
| Debond of the whole restoration early | Contamination during try-in or placement; failure to etch and silanate the intaglio (or a pre-etched product that passed its usable window) |
| Debond on a tooth with heavy existing composite | Dentin and composite substrate have lower bond strength than enamel (A3); reassess isolation and substrate for the next case |
For returned cases, three pieces of information open the diagnostic: a close-up photo of the margin, the cement and shade used, and the clinical sequence as it was actually performed. The failure usually traces to one step, and that step tends to sit upstream of the cement itself.
How Istar runs a veneer case
Production and capacity
The ceramic team is part of a 460-person production facility in Shenzhen and Huizhou, running CAD design, 3D model printing, CAM milling, ceramic pressing and layering, glazing, polishing, and quality inspection in-house. Standard capacity includes dedicated veneer scheduling even during peak season.
Turnaround
For a routine ceramic veneer case, lab working time is typically 2–3 business days from the moment case data is complete; the full turnaround Istar quotes clients for ceramic restorations is in the 7–10 day range, which includes international shipping. Design review and awaiting-approval time is not counted against the production clock — the clock resumes when the design is approved or the missing records arrive. Status notifications fire at design completion, production completion, and shipping, with a courier tracking number attached.
Regulatory status
Istar maintains valid FDA establishment registration and device listing (US), MDR custom-device notification (EU), MHRA registration (UK), and ISO 13485 for the lab’s quality management system. These are market-access registrations, not product-approval claims. Batch-level material brand, origin, and lot number are available per case on request.
Working policies
- Impressions. Digital files for intraoral scans, VPS or polyether for physical impressions, or shipped stone models. Alginate is not recommended for international shipping due to dimensional-stability and biosecurity issues at customs.
- Case documentation. Clinical photographs tighten the aesthetic result: facial and smile line, retracted frontal, prep shade with a shade tab in frame, and existing-tooth or diagnostic wax-up photos for layered cases.
- Design review. One design round is included; two revisions are free. Adding a design-review stage extends production by 1–2 business days.
- Remakes. Lab-side defects — margin opening, proximal contact issues, cosmetic flaws clearly on the lab side, occlusion high on the model — are remade without charge. Shade changes after design approval, preparation changes, or cases where the clinician asked Istar to proceed despite flagged risks fall outside the free-remake category.
- Case data handling. Clinic-provided files remain the clinic’s property; Istar uses them only to produce the case and deletes them on written request within the retention window required by regulation.
Send a case with a note on the clinical goal, the restorative space expected, and the aesthetic constraints. The design proposal that comes back identifies anywhere thickness is pushing against the 0.8 mm boundary, so the cement choice is settled before the restoration is milled.
Send a veneer case — or read more about E.max veneer workflow and zirconia veneer options.
FAQ
Does Istar accept intraoral scans from Medit, iTero, Trios, and Primescan?
Yes. Any scanner that exports STL, PLY, OBJ, DCM, or 3Shape native files works. For Trios cases the native DCM file is preferred since it carries color data and texture that compressed STL loses.
Can the facility be audited before placing a veneer order?
Yes. The Shenzhen and Huizhou facilities support on-site visits and video factory inspections, covering the production line, the digital workflow, and the quality-control sequence. Audit requests can be scheduled through the account contact.
Is prescriber identity shared with the lab, or can a clinic submit anonymized cases?
Anonymized submissions are standard. A clinic internal case number replaces the patient name on all paperwork, and the production team works from internal case IDs rather than clinical records. A mutual confidentiality agreement is available on request.
Which paperwork ships with the case for EU and US destinations?
For EU destinations the custom-device statement under MDR Annex XIII ships with every restoration. For US destinations the device-listing reference is printed on the case card, and the device-listing numbers themselves are available for verification against the FDA public database on request.
What file is produced for the clinician before the restoration goes to milling?
A design preview — screenshot or STL of the proposed restoration geometry — is sent for approval when the clinician has opted into design review. Approval is captured by email or WhatsApp before CAM. Opting out of this step shortens the lab working window by 1–2 business days.
If a shipment is lost or damaged in transit, how is replacement handled?
Transit damage is replaced from the retained design file without re-charging for lab work; the client provides photographs of damaged packaging and a tracking record from the courier. If the design file is unusable (for example when the original stone model was in the shipment and arrived broken), a new scan or impression is requested before the remake begins.